Share objects
- Tracking Issue: https://github.com/datafuselabs/databend/issues/6973
Summary
Describes creating and managing shares for tenants, and sharing shares with other tenants. A tenant identifier uniquely identifies an account within your organization.
The following database objects can be shared:
- Tables
- Views
- UDFs
All database objects shared between tenants are read-only, this means that the shared objects can not be modified or deleted.
What is shared?
Shares are named objects that encapsulate all of the information required to share a database. Each share consists of:
- The privileges that grant access to the database to share.
- The privileges grant access to the specific objects in the database.
- The consumer tenants with which the database and its objects are shared.
After a database is created from a shared database, all the shared objects are accessible to users in the consumer account.
Data Provider and Consumer
Provider
A data provider is any tenant that creates shares and makes them available to other tenants to consume. As a data provider, tenants can share a database with one or more tenants. For each shared database, the provider can use grants to provide access control to objects in the database.
Consumer
A data consumer is any tenant that chooses to create a database from a share made available by a data provider. As a data consumer, once the provider adds a shared database to your tenant, the consumer can access and query the objects in the database just as you would with any other database in your account.
How does data sharing work?
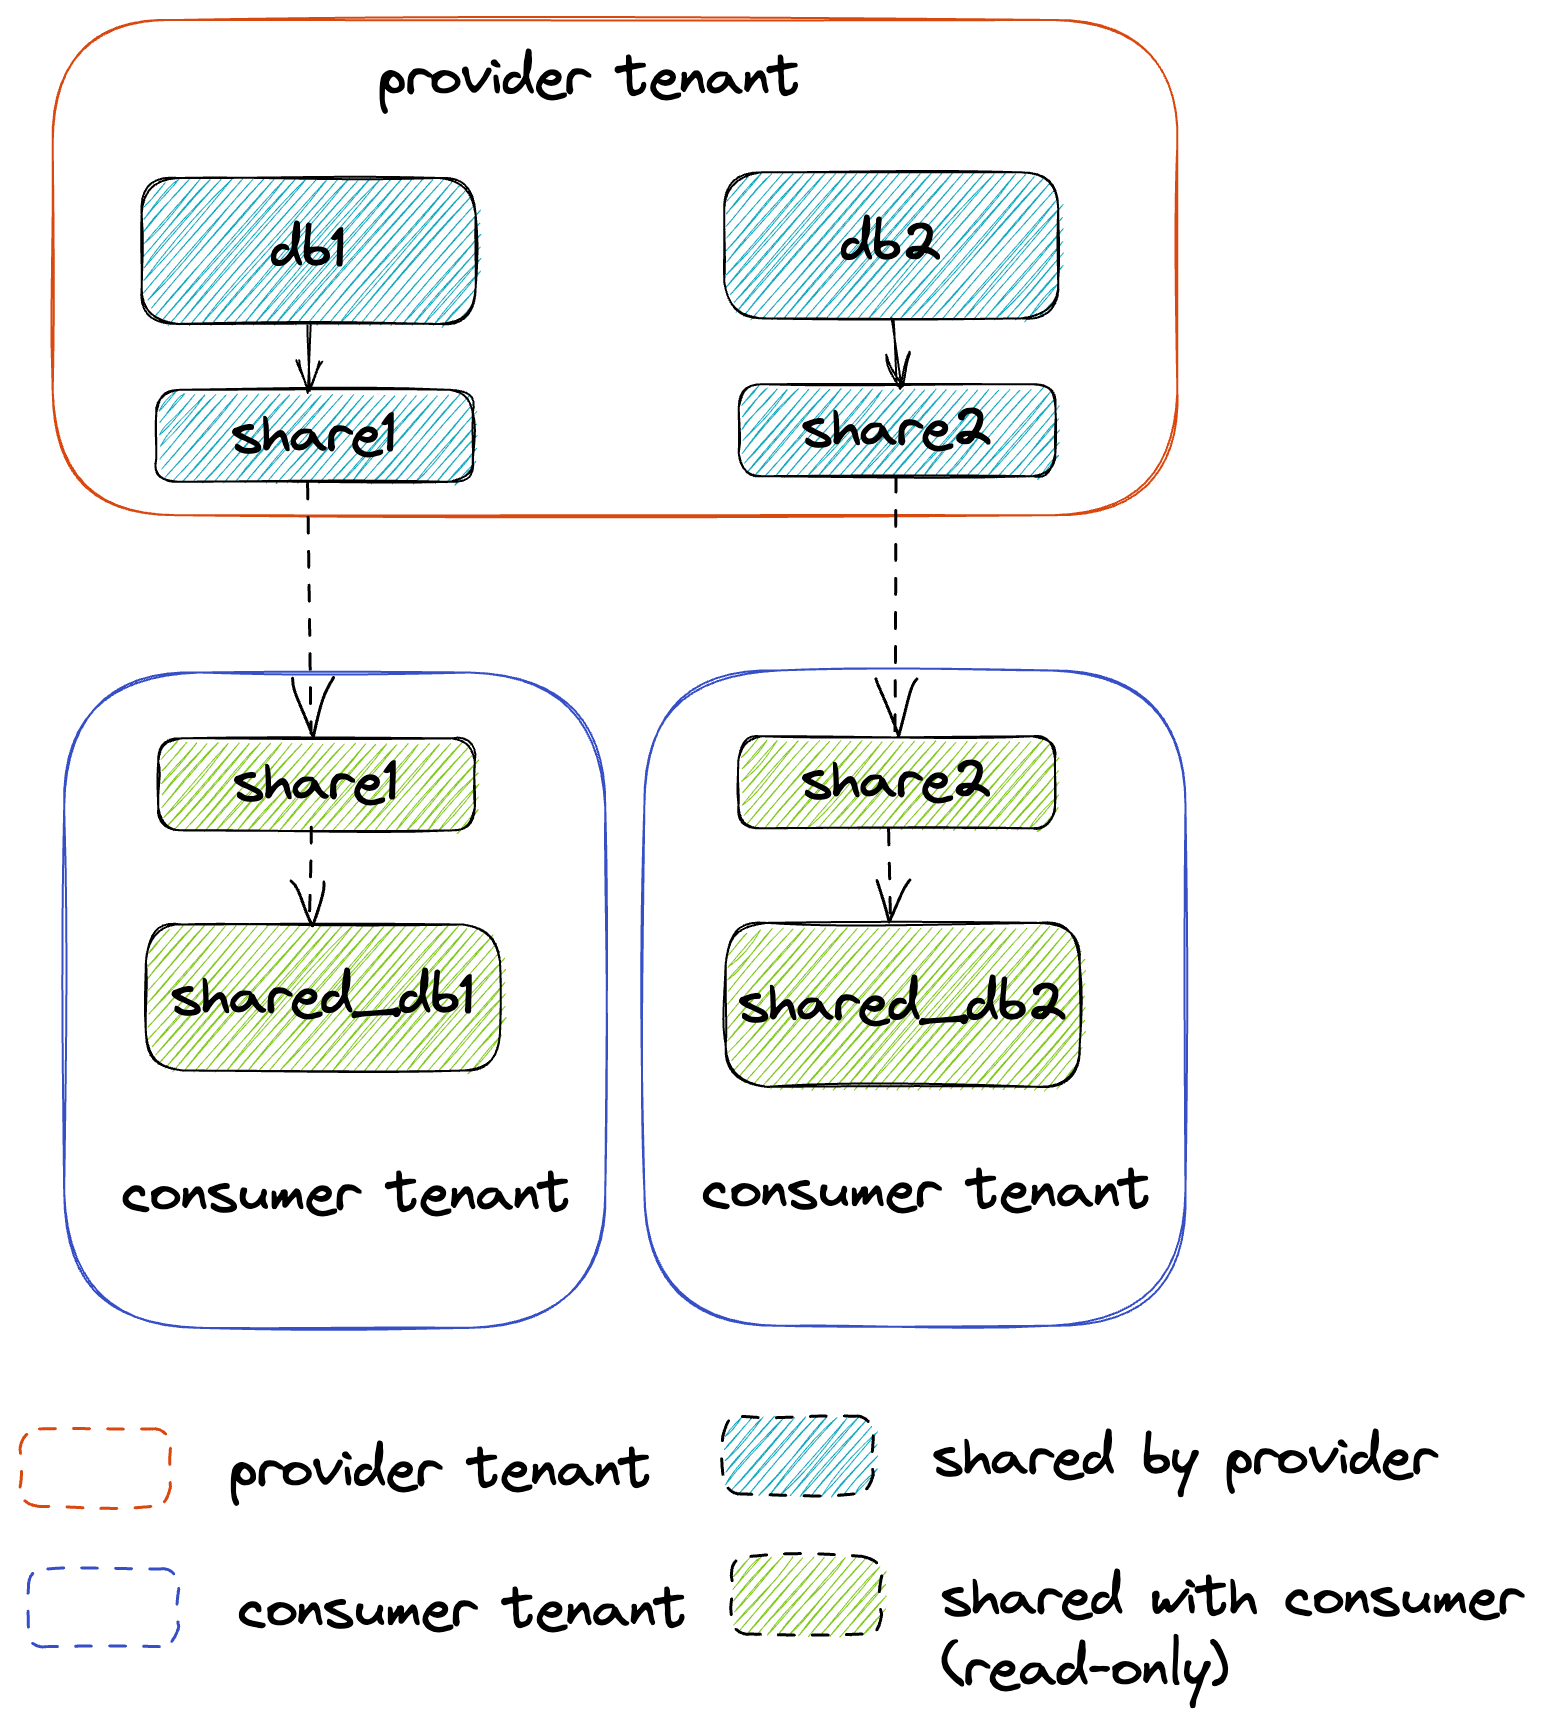
With Data Sharing, no actual data is copied or transferred between the providers and consumers:
- The provider creates a share of a database in their account and grants access to specific objects in the database. One or more tenants(aka
consumers) are then added to the share, which can access the shared database and other shared objects. - On the consumer side, a
read-onlydatabase is created from the share. It means that the consumer has no permission to modify shared data objects, likeupdate,insert,delete,drop, etc. - Because there is no data copied between the providers and consumers, once the provider drops the shared objects(like
drop database,drop table, etc), then the consumer can not access the shared objects anymore.
Shared object privileges
There are three kinds of shared object privileges:
- USAGE: for database.
- SELECT: for table or view.
- REFERENCE_USAGE: for database.
Some notes about privileges:
- The
USAGEprivilege on only a single database can be granted to a share; however, within that database, privileges on multiple objects(like UDFs, tables, etc.) can be granted to the share. - Privileges on individual objects must be granted to a share in separate GRANT statements.
- Use the
REFERENCE_USAGEprivilege when sharing a secure view that references objects belonging to multiple databases, as follows:- The
REFERENCE_USAGEprivilege must be granted individually to each database. - The
REFERENCE_USAGEprivilege must be granted to a database before grantingSELECTon a secure view to a share.
- The
DDL for Shares
To support creating and managing shares, Databend provides the following set of special DDL commands:
- Create Share
- Drop Share
- Alter Share
- Grant share object privilege TO Share
- Revoke shared object privilege FROM Share
- Show Share
- Describe Share
- Show Grants
- Create Database, Table FROM Share
- Select data from the Share DB tables
- Show shared database tables
Create Share
Create an empty new share. Once the share is created, the user can use the GRANT <privilege> ... TO SHARE command to include a database and objects in the database (tables) in the share. Users can then use ALTER SHARE to add one or more tenants to that share.
Syntax:
CREATE SHARE [IF NOT EXISTS] <share_name> [ COMMENT = '<string_literal>' ]
Drop Share
Remove the specified share from the system and immediately revoke access to all tenants (i.e., the tenants that created the database from that share).
Syntax:
DROP SHARE [IF EXISTS] <share_name>
Alter Share
Modify the properties of an existing share.
- Add or remove tenants from the tenant list.
Syntax:
ALTER SHARE [IF EXISTS] <share_name> {ADD | REMOVE} TENANTS = <tenant_name> [, <tenant_name>, ...]
Grant share object privilege TO SHARE
Grant access to the database and other supported database objects (tables, views, etc.) to a share. Granting permissions to these objects effectively adds them to the share, which can then be shared with one or more tenants.
Syntax:
GRANT object_privilege ON grant_share_object_name TO SHARE <share_name>

object_privilege ::= [
-- For DATABASE, SCHEMA, or FUNCTION
    USAGE |
-- For TABLE or VIEW
    SELECT |
-- For DATABASE
    REFERENCE_USAGE]

grant_share_object_name := { DATABASE <db_name> | TABLE <db_name>.<table_name> }
Revoke share object privilege FROM SHARE
Revoke access to databases and other supported database objects (tables, views, etc.) in the share. Revoking permissions to these objects effectively removes them from the share, making them inaccessible to all tenants that have created databases in the share.
Syntax:
REVOKE object_privilege ON grant_share_object_name FROM SHARE <share_name>

object_privilege := [USAGE|SELECT|REFERENCE_USAGE]

grant_share_object_name := { DATABASE <db_name> | TABLE <db_name>.<table_name> }
Show Share
Show all shares that have been created by your tenant or are available to consume by your tenant.
Syntax:
SHOW SHARES;
Output:
The output of the SHOW SHARES command is a list of shared object information, with columns Created_on, Kind, Name,Database_name, To, From, and Comment.
If the share is created by your tenant, then Kind is OUTBOUND; otherwise, if the share is available to consume by your tenant, then Kind is INBOUND and To is empty.
Describe Share
Describes the shared objects that are included in a share.
Syntax:
{DESC|DESCRIBE} SHARE <share_name>
Output:
The output of DESCRIBE SHARE command is a list of share objects information, with columns Kind, Name,Shared_on, for example:
+----------+--------------------------------------+-------------------------------+
| Kind     | Name                                 | Shared_on                     |
|----------+--------------------------------------+-------------------------------|
| DATABASE | tenant1.db1                          | 2022-08-11 18:04:17.642 -0700 |
| TABLE    | tenant1.db1.table1                   | 2022-08-11 18:04:17.749 -0700 |
+----------+--------------------------------------+-------------------------------+
Note that each share object's name prefix with the <tenant_name>..
Show Grants
Lists all access control privileges that have been explicitly granted to tenants and shares.
Syntax:
SHOW GRANTS ON grant_share_object_name
SHOW GRANTS OF SHARE <share_name>

grant_share_object_name := { DATABASE <db_name> | TABLE <db_name>.<table_name> }
SHOW GRANTS ON grant_share_object_name: Lists all privileges that have been granted on the object.SHOW GRANTS OF SHARE <share_name>: Lists all the tenants for the share and indicates the tenants that are using the share.
Create Database, Table FROM Share
After tenants have permission to access the shared objects, can create the database from the share.
Syntax:
CREATE DATABASE <name> FROM SHARE <provider_tenant>.<share_name>
Select data from the Share DB tables
After tenants have created a database from a shared database, tenants can select data from the shared table like a normal table, before that the providers MUST have permitted access permission to the shared database and table.
Syntax:
Select * from <share_db_name>.<table_name>
Show shared database tables
After tenants have created a database from a shared database, tenants can show tables from the shared database, it only outputs the tables which have been permitted to access.
Syntax:
use <share_db_name>;
show tables;
Example of Using Share with SQL
To create a share using SQL:
- Use the
CREATE SHAREcommand to create an empty share. - Use the
GRANT <privilege> … TO SHAREcommand to add a database to the share and selectively grant access to specific database objects (tables). - Use the
ALTER SHAREcommand to add one or more accounts access to the share. - Use the
CREATE DATABASE ... FROM SHAREcommand to create a database from the share.
Step1: Create an Empty Share
The following example creates an empty share named t:
create share t;
Step 2: Grant Privileges for a Database and Objects to the Share
To include objects in a share, grant permissions to each object. When granting permissions, first grant usage rights to any container objects before granting usage rights to the objects in the container. For example, grant access to the database before granting access to any table included in the database.
The following example illustrates granting privileges on the following objects to the t share created in the previous step:
grant usage on database db1 to share t;

grant select on table db1.table1 to share t;
After granting the object privileges operations, can add tenants to the share.
Step 3: Add Tenants to the Share
The following example adds two tenants to the t share:
alter share t add tenants=x, y;
After altering share add tenants, now tenants x and y have the permissions to create objects(database, tables) using the sharing object.
Step 4: Create a Database from the Share
Now tenant x creates database db from the share t:
CREATE DATABASE db FROM SHARE t